Monday, July 29, 2013

Love to Bake with The Queen of Tarts

The Queen of Tarts 

Cookies & Tools

The perfect Red Velvet Cupcake  

The event


I have to confess that I am more of a savoury cook than a sweet baker. Don’t get me wrong, a slice of moist dark chocolate cake or a piece of fruit pie with rich vanilla custard can make my palette sing, but when it comes to baking I’m pretty useless…

So when I meet bakers like Tina Bester aka The Queen of Tarts, who elegantly navigates her way around a kitchen while effortlessly working on not one, but three sweet creations at once(!) I become seriously inspired.

The ‘Love to Bake’ event was hosted by Good Housekeeping magazine at L’Ancienne Residence where we were treated to tasty canapés, more cookies from Moir’s than you can imagine and delicious South African bubbly. Tina took the stage and demonstrated how to bake three of her signature desserts: Apple, ginger & caramel tart, Chocolate frangipane & pear tart with almonds and Red velvet cupcakes, using funky bake-ware from the Clicks Love to Bake range.

The smells in the kitchen were intoxicating, and after properly having our taste buds whet we got to taste Tina’s baking creations – YUM! I loved her Apple and ginger tart so much I decided to give it a try, here is the recipe:


Apple, Ginger & Caramel Tart
Makes one big tart

You will need
For the crust:
300g Moir’s Ginger biscuits, crushed (use a food processor for this)
120g butter, melted
6-8 apples, peeled and cored
125ml water
55g castor sugar
40g Moir’s Ginger preserve, thinly sliced
For the Caramel:
130g brown treacle sugar
180ml golden syrup
60g butter, melted
4 eggs
80ml pouring cream

How to make it
Preheat the oven to 180°C.
Combine the crushed ginger biscuits and butter in a bowl and mix well.
Pour into a loose-bottomed tart tin and gently press the mixture into it. (Use the back of a spoon.)
Bake it blind for 8 minutes.
In the meantime, peel the apples, cut them in half and core them. Place the cored apples on a flat surface and cut thin lines (about 1cm deep) into the top of the apple halves.
Place them in a pot with the water and castor sugar (add more water if needed) and cook the apples for 8 minutes. Drain them and place them cut side down on the ginger biscuit base.
Dot thin slices of the ginger preserve between the apples.
Combine all the ingredients for the caramel in a bowl and whisk well.
Pour the caramel over the apples, filling the tart shell to the top.
Bake for 35-40 minutes, checking on the tart half way through. You might need to cover the edges with foil towards the end of the cooking time so the crust does not overcook.
The tart should have a slight jiggle in the centre.
Serve as is, or with thick cream or ice cream.

Tips
    - I halved the recipe and it worked perfectly.
-   - If you can’t find Moir’s ginger preserve, slice about 10cm fresh ginger into thin strips and boil it in the sugar water you cooked the apples in until it starts to caramelise. Allow to cool, and scatter over the tart.
-   - Oil your measuring spoon or cup before adding the syrup, this helps it from sticking.


Thursday, July 25, 2013

The Jamie Oliver Food Processor


We just love the guys at Philips. And we also love Jamie Oliver (who doesn't? He’s impossibly cute, makes simple, delicious food and is probably responsible for taking cooking from ‘the work of chefs’ to ‘everybody can do it, just play!’)

Philips and Jamie came together to create a range of fabulous kitchen tools – a Hand Blender, Food Processor, Blender, Steamer and HomeCooker, and we were given the opportunity to use and review the Food Processor, here are our thoughts:


First impressions and look
We aren't big fans of blue in the kitchen (but this is just a personal preference), we tend to go for warmer reds and oranges. But we must admit that the white body, see-through container and blue accent do look very ‘fresh’.
It’s a very compact machine (with retractable power cord) that fits easily into a kitchen cupboard.
Loved the round shape.

General handling
It’s sturdy. All the elements click neatly into each other and the strong suction cups ensure that it doesn't wriggle around on your work space.
We loved the big rounded opening for adding ingredients, and its 2 attachments for making the opening smaller or for directing ingredients onto the blades.

Performance and features
The engine is extremely powerful (1000W of power to those of you that understand that kind of thing).
We loved the adjustable slicer, so you can determine the thickness of your slices.
It does have a tool for kneading dough, but this is not its strong point.
It has a double balloon beater, so whisks egg whites to stiff peaks in seconds.
The citrus press is fast and powerful.
It also has a serrated knife that makes sorbet or frozen dessert from berries and fruit.

In a nutshell
This food processor makes prepping a dream! It slices, grates and shreds just about anything and pulverises ingredients in seconds.
It’s easy to clean – dishwasher safe!
It’s easy to store.
It’s pretty good looking.
So all in, we give the Philips Jamie Oliver Food Processor a thumbs up!

The Jamie Oliver Food Processor sells for around R1599.00
Read more about the extended range here: http://www.philips.com/Jamies-tools

This is one of the dishes we made during our review of the processor, and it was so delicious we just had to share the recipe!

Leek & Broccoli Soup with Mature cheddar toasts
Serves 4
(Based on a recipe from the July’13 Fresh living magazine)

You will need
4-6 leeks, cleaned and sliced finely (the Jamie Oliver Food Processor did this in seconds)
Knob butter
Olive oil
1 Tbsp fresh rosemary, chopped
2 garlic cloves, chopped
2 heads broccoli (about 500g), chopped into smaller florets
3 cups vegetable stock
Salt & Black pepper
Mature cheddar, grated
4 small seed rolls, sliced in half

How to make it
Fry the leeks in butter and a dash of oil on a low heat until they are soft.
Add the rosemary, garlic, broccoli and vegetable stock.
Simmer until the broccoli is soft (about 10 minutes.)
Blitz the mixture in a food processor until it reaches a smooth consistency.
Season to taste with salt & pepper.
Sprinkle the seed rolls with loads of cheddar cheese.
Under a hot grill, allow the rolls to toast and the cheese to start bubbling.
Serve immediately with the re-heated soup.
*Garnish the soup with some more mature cheddar for some extra cheesiness.


Monday, July 22, 2013

Freshly Blogged: Challenge 3

Click HERE to vote for this recipe.


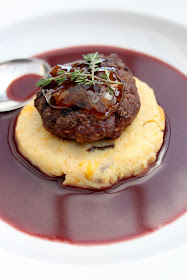
Uniquely South African ingredients are so exciting, and in this challenge Pinotage, ostrich meat, mealie meal, dried fruit, chutney & braai took center stage. I wanted to add a glamorous touch to your standard pap-and-wors braai by deconstructing, combining and plating the ingredients in an unexpected way.

Moroccan Ostrich on Fruity Mealie Meal in a Red Wine Jus
Serves 4
Time: 1.5 Hours

You will need
For the mealie meal:
1 Cup mealie meal
Pinch saffron
1 Cup Mixed dried fruit
Salt

For the Red Wine Jus:
6 Shallots, finely diced
Olive oil
2 Cups Drostdy Hof Pinotage
2 Cups Beef stock
Sprig fresh thyme
2 Tbls butter

For the Ostrich rounds:
500g Ostrich sausage
½ Tbls Cumin, powder
¼ tsp Cloves, powder
Oil
Fruit chutney for serving

How to make it
For the mealie meal:
Add a good pinch of saffron to the water you’re going to cook the mealie meal in.
Cook the mealie meal according to the packet instructions (make it smooth & stiff, not crumbly.)
Meanwhile, soak the dried fruit in boiling water for 20 minutes or until supple.
Chop the fruit into tiny cubes and mix into the cooked mealie meal.
Season to taste with salt.
Tip: If the mealie meal is too sloppy by the time you need to serve it, cook it some more, or mix in 2 eggs and bake it for a while.

For the Red Wine Jus:
Heat a splash of olive oil in a heavy based pan.
Fry the shallots over a low heat until translucent.
Add the Drostdy Hof Pinotage, beef stock and a sprig of thyme and reduce by half. (To a consistency that will coat a spoon.)
Strain the sauce through a fine sieve and return to the pot until you are ready to serve.

For the Ostrich rounds:
Cut the casings off the ostrich sausage and remove the meat, discard the casing.
Using your hands, mix in the cumin and clove powder into the meat until well combined.
Ostrich meat can be quite sticky, brush some oil over your hands to prevent this.
Roll the ostrich mince into gholf-ball sized rounds (you should get 8-10).
Press each round flat to a 3cm thickness and make an indent in the center of the round (it helps to prevent it from curling up too much during cooking.)
Lightly brush the rounds with oil (if needed) and braai on an open fire for 3-5 minutes – don’t over-cook them, it’s best served medium rare.

For serving:
Re-heat the mealie meal and form a portion sized round to place in the center of a deep plate or bowl.
Heat the red wine jus and add 2 Tbls butter, stirring until the butter is melted and well combined.
Pour the jus around the mealie meal.
Place an ostrich round (or two) on top of the mealie meal.
Garnish with a drop of fruit chutney and fresh thyme.

Sunday, July 21, 2013

Complementary flavours explained, simply

How extraordinary are these simplified graphs of complementary flavours?


See the full-sized graphs here.
(Thanks to Bury&Discover for discovering this :)


Thursday, July 18, 2013

Women's Day Gifts

Sweet treats for lovely ladies...

for more details, visit

or contact 

Andanté

Wirie

 for orders

Monday, July 15, 2013

Freshly Blogged: Challenge 2

 Click HERE to vote for this recipe.


This is a curl-up-in front-of-the-fire kind of dish. Winter and slow cooking are the inspiration behind this recipe – weekends spent with family holed up, away from the cold, sipping a glass of red wine while a warming dish like this is cooking away.

Meaty tomato sauce with Gnocchi
Serves 4
Time: 2 Hours

You will need
For the sauce:
500g Beef shin
Flour
Salt
Black pepper
Vegetable oil
2 Knorr Beef stock pots
750g Rosa tomatoes, peeled, seeded and finely chopped
1 Large carrot, finely diced
2 Leeks, finely sliced
1 Large celery stick, finely sliced
1 Tbls Sugar
1 Tbls White wine vinegar
2 Whole Star Anise
Fresh basil
For the Gnocchi:
4 Cups (about 600g) Gnocchi
Olive Oil

How to make it

For the sauce:
Cut the beef shin into large chunks (they don’t have to be eve sized). Dust them with flour, salt and pepper.
Heat 1 Tbls vegetable oil in a pressure cooker or a heavy based pot.
Brown the meat on both sides.
Pour boiling water over the meat until just covered and add one Knorr Beef stock pot.
If using a pressure cooker, bring to the boil and cook on pressure for 20 minutes.
If using a heavy based pot, cook for 1 – 1 ½ hours until the meat is tender.
Remove the meat from the stock and set aside.
Remove the stock from the pot and set aside.
In the same pot, heat another tablespoon of vegetable oil and fry the leeks, celery and carrot for 5 minutes on a medium heat. Add the tomatoes.
Add a 1/3 of the beef stock and boil the vegetables for 15 – 20 minutes until the carrots are tender.
With a stick blender, liquidize the sauce to a consistency of your liking.
Add another Knorr Beef stock pot,1 Tbls white wine vinegar and 1 Tbls sugar.
Reduce the sauce to a coating consistency.
Add the star anise and cook it with the sauce for 5 minutes, remove.
Season with salt and black pepper to taste.
Once the meat is cool, cut it into bit-sized pieces, removing any bones, fat and sinew.
Add to the sauce.

For the Gnocchi:
Boil the gnocchi in salted boiling water.
Drizzle cooked gnocchi with olive oil to prevent it from sticking.

Just before serving, heat the sauce through.

Serve with gnocchi and garnish with fresh basil.

Tuesday, July 9, 2013

Freshly Blogged Competition - First entry

I'm taking part in the PnP Freshly Blogged competition! 

40 bloggers from all over SA have been selected to take part in a weekly cooking competition, and every week a new challenge is set with a mystery basket of ingredients. The idea is to come up with creative recipes and beautiful photographs. As the weeks go on, bloggers entries are judged by a panel and every week 4 bloggers get eliminated, eventually culminating in a cook-off.

Go check out all the recipes here: freshlyblogged.co.za

Don't forget to vote for my recipe (Thai Veggie Delight - 3 Ways, under Andanté Wiehahn), you stand to win weekly prizes :)

Here is my entry for the first challenge: 


A selection of Thai flavoured vegetarian dishes that can be served as a platter main, or individual starters. 

Thai Veggie Delight – 3 Ways
Phyllo cups, Noodle nests & Samoosas
Serves 4

You will need

2 packets (500g each) Findus Wok Thai vegetables
1 roll (500g) PnP phyllo pastry (defrosted in the fridge overnight)
PnP cook additions crushed garlic, ginger and dhania paste
PnP 2-minute noodles (any flavour)
1 orange (zested & juiced)
1 pineapple
2 Red chillies, finely chopped (seeds in for a hotter version)
Butter
Cooking Oil
Olive oil
Flour
2 Eggs
Brown sugar
Salt & pepper
Black sesame seeds for garnish


How to make it

The veggies:
Heat a tablespoon of cooking oil in a wok and fry 1 tablespoon chopped chilli and the garlic, ginger & dhania paste for 1 minute.
Add the frozen veggies to the hot wok bit by bit.
Fry until the veggies are soft but still crispy.
Remove from wok and set aside.

The noodle nest:
Remove noodles from the packaging and discard the flavour sachet.
Pour boiling water over the noodles (covering them) and microwave for 1 minute.
Drain the noodles well and spread them out on wax paper.
Leave them to dry for about 30 minutes.
Heat 3 cups of cooking oil in a small deep pot.
Deep fry the noodles in the hot oil in batches until they become crispy.
Drain on paper towels and set aside.
Fry 2 eggs into an omelette and cut into strips, mix with 3 cups of the veggies.
Layer the re-heated veggies on top of the crispy veggies just before serving.

The phyllo cups:
Pre-heat your oven to 180°C.
Melt 2 tablespoons of butter in the microwave.
Remove 2 sheets from the roll and store the rest in the plastic sheet covered with a damp towel.
Cut the sheet (double layer) into quarters.
Paint the back and front of each phyllo quarter with the melted butter.
Gently place each quarter into a hole in a large muffin tray, forming a cup.
Bake until golden brown and crispy – about 10 minutes.
Set aside.
Make 6 – 8 of these.
Fill the cups with re-heated veggies just before serving.

The dipping sauce:
Heat a griddle pan until it’s scorching hot and fry 4 – 5 thick pineapple slices until burnt griddle marks appear.
Set aside. Once cool, cut into small (5mmx5mm) pieces.
Melt 1 tablespoon butter in a saucepan and fry the orange zest and 1/2 tablespoon chilli for 2 minutes until fragrant.
Sift a tiny bit of flour into the butter mix and stir vigorously until it starts to thicken.
Add 1 tablespoon brown sugar, the lemon juice and enough water until it reaches a consistency of a dipping sauce.
Add the grilled pineapple pieces.
Taste and season with more sugar, salt or chilli to taste.
Serve at room temperature.

The samoosas:
Pre-heat your oven to 180°C.
Take 2 cups of the cooked Findus veggies and chop finely with a mezzaluna or food processor.
Taste and season with more of the ginger, garlic & dhania paste and salt if needed.
Melt 2 tablespoons of butter in the microwave.
Remove one sheet of phyllo pastry from the roll and with a pizza cutter, cut the sheet into 3 long equal strips. Brush all three strips with butter.
Spoon a heaped tablespoon of the veggie mix onto the left bottom corner of each strip (2cm from the edges).
Fold over the right corner to cover the filling.
Fold again along the upper crease of the triangle, and keep folding this way till you have used all the pastry.
Brush with some more butter to close the pastry and trim the edges if necessary.
Sprinkle with sesame seeds and bake for about 20 minutes until golden and crispy.
Serve with the dipping sauce.

Phyllo cups (compiling):
Re-heat the cooked Findus veggies and fill the phyllo cups with the mix,
Garnish with black sesame seeds.

Noodle nests (compiling):
Re-heat the cooked Findus veggies and gently place a serving on top of the crispy fried noodles,
Garnish with black sesame seeds.


Friday, July 5, 2013

Cinnamon Hot Chocolate

Winter has hit Joburg in a big way – why not snuggle up on the couch tonight with this indulgent warming treat?

Cinnamon Hot Chocolate
Serves 2

You will need
2 Tbls good quality cocoa
2 tsp cinnamon powder
3 Tbls white sugar
500ml low fat milk
125ml fresh cream
Whipped cream or milk froth for serving

How to make it
Combine the cocoa, cinnamon, sugar and milk in a heavy based pot.
On a low heat, stir the mixture until the sugar is dissolved.
Turn up the heat, bring the mixture to the boil and remove from the heat immediately.
Divide between two tall glasses or mugs.
Serve with a dollop of whipped cream.

Tips
- Add more sugar if you like it sweeter.
- You can use skim milk only for a skinny version, but trust us, the creamy version is much yummier!
- If your cream is thick enough, garnish with chocolate covered raisins for even more indulgence. 

Thursday, July 4, 2013

Istanbul: Colour & Spice

Istanbul is an enormous melting pot of cultures. The influences range from Mediterranean to Asian to Middle Eastern – and nowhere is it better illustrated than in the markets. The Grand Bazaar and Spice Bazaar are brimming with and explosion of colours and flavours.

Overwhelming and intoxicating, the Spice Bazaar sells everything from ‘Love Tea’ to pink peppercorns to Sumac to designer (and expensive) Turkish Delight… Needless to say, we had to go back to the hotel to unload the bags of spices I bought J

Here are some pics from the markets.

Delicate glass work

The Spice Market

Tea, spices and Turkish Delight

Ceramics and fabrics